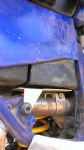
I just put some rockwool [fire rated wall insulation] under the battery, you can put in a fairly thick piece as it compresses a fair bit. I have tried exhaust wrap but it doesn't last long for the price.
I made up an efficient leg heat shield to replace the factory one. get some box section aluminium in 50x25mm comes in various wall thickness, I used 3mm. cut it to a length you consider suitable and mitre both ends at 45 degrees, that is stand the job on it's 25mm side and saw it off at 45 degrees both ends with the back face the longest.
Think carefully before you cut or you will have to start again. I used a cold saw, then deburr and buy a stainless socket head machine screw of the same thread as the one's that screw into the side of the exhaust. drill a hole in the side of the job that will go against the exhaust [ of the same size as the machine screw thread ] exactly in the centre and where you judge to be the correct spot to screw it to the exhaust mounting point.
Now bore through both sides using a drill press. enlarge the hole on the outer side enough to allow you to pass the head of the socket screw through on the end of a allen key. you could put a stainless washer under the socket head also. when you do it up tight you will see that you cannot use the same fastening method on the rear mounting point [there will be a huge gap] I cut 2 tiny slots in the back face of the job using a dremel grinder with a metal cutoff wheel about the diameter of the exhaust apart vertically.
Get a stainless worm drive hose clamp [jubilee clip to you] pass it through the slots, top slot first. screw the shield to the front mount first [have you cut the machine screw to the correct length first] loop the hose clamp around the exhaust [did you buy a long enough clamp] and connect up. if your careful you can pull it down right up against the rear mounting point without breaking the front mount.
I bought a piece of what we call propeller plate [ checker plate] and glued it to the leg side of the shield with one of the very high heat resistant automotive silicones, clamped it for a few days then ground it down to fit the extrusion on all edges with a linisher, you could just use a file. then drilling through from the exhaust side again and enlarge the front outside hole so you can access the front mounting screw. you can use countersunk rivets as well to hold the propeller plate on.
I would advise sitting on your machine first to work out how long you want it to be, but make certain it protrudes far enough behind your leg to be safe and comfortable. you don't want the trailing edge hitting your shin in an accident. you can put automotive type pinchweld on the trailing edges for safety. leaves the factory shield for dead as far as heat protection goes.
I just put some rockwool [fire rated wall insulation] under the battery, you can put in a fairly thick piece as it compresses a fair bit. I have tried exhaust wrap but it doesn't last long for the price. I made up an efficient leg heat shield to replace the factory one. get some box section aluminium in 50x25mm comes in various wall thickness, I used 3mm. cut it to a length you consider suitable and mitre both ends at 45 degrees, that is stand the job on it's 25mm side and saw it off at 45 degrees both ends with the back face the longest. think carefully before you cut or you will have to start again. I used a cold saw, then deburr and buy a stainless socket head machine screw of the same thread as the one's that screw into the side of the exhaust. drill a hole in the side of the job that will go against the exhaust [ of the same size as the machine screw thread ] exactly in the centre and where you judge to be the correct spot to screw it to the exhaust mounting point. now bore through both sides using a drill press. enlarge the hole on the outer side enough to allow you to pass the head of the socket screw through on the end of a allen key. you could put a stainless washer under the socket head also. when you do it up tight you will see that you cannot use the same fastening method on the rear mounting point [there will be a huge gap] I cut 2 tiny slots in the back face of the job using a dremel grinder with a metal cutoff wheel about the diameter of the exhaust apart vertically. get a stainless worm drive hose clamp [jubilee clip to you] pass it through the slots, top slot first. screw the shield to the front mount first [have you cut the machine screw to the correct length first] loop the hose clamp around the exhaust [did you buy a long enough clamp] and connect up. if your careful you can pull it down right up against the rear mounting point without breaking the front mount. I bought a piece of what we call propeller plate [ checker plate] and glued it to the leg side of the shield with one of the very high heat resistant automotive silicones, clamped it for a few days then ground it down to fit the extrusion on all edges with a linisher, you could just use a file. then drilling through from the exhaust side again and enlarge the front outside hole so you can access the front mounting screw. you can use countersunk rivets as well to hold the propeller plate on. I would advise sitting on your machine first to work out how long you want it to be, but make certain it protrudes far enough behind your leg to be safe and comfortable. you don't want the trailing edge hitting your shin in an accident. you can put automotive type pinchweld on the trailing edges for safety. leaves the factory shield for dead as far as heat protection goes.