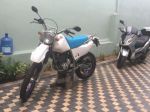
I wanted to see if I could reduce the slope towards the tank on my Raid seat, while also getting some added padding and making it a little higher in the process. I'm 6 foot 3 (192 cm) and feel a bit cramped on the bike, especially as I keep sliding forward and down towards the tank. I have never liked a forward sloping seat on any of my bikes. Maybe I should learn to do wheelies to appreciate this style of seats..?
I have two seats, one original in good condition which I recently got reupholstered, and a second one that I have been using until now, with some damage to the foam. I decided to try to add some foam and reshape the second one.
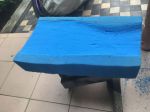
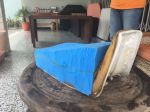
I found some relatively stiff foam here used for furniture. Not ideal, but it was the best I could find. I also tried finding some foam from old car seats, closer to the foam used in bike seats, but the cushions I found were all too small and in bad condition.
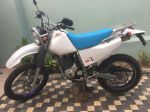
Here's a picture of the standard Raid seat on my bike. I have done some rides close to 200 km on it and it's not too bad, but could certainly be improved for me. It has a pronounced slope, and the padding at the rearmost part where I mostly sit is very thin.
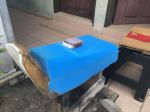
I removed the cover from my second seat and started making it a little flatter at the front where it is more rounded. I also started carving out a corresponding shape on the new foam so it would fit the seat foam and to make the glue hold better.
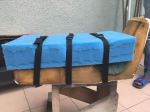
Following this I glued them together. I used some foam/upholstery glue from a spray can and that stuff just adheres immediately, and hard. Also to your fingers. I waited a few minutes before starting to shape the foam.
The piece of foam I had was a little short and didn't cover the whole seat, so I decided to finish shaping the main seat area before adding foam to the front. Cutting with a hacksaw blade and sanding with some 40 grit paper worked really well on this foam.
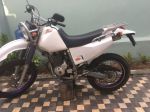
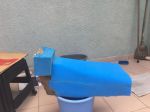
I took the seat to the upholsterer who has done my other seats and asked him to find some vinyl that matches the colour of the blue foam. While testing the seat on the bike with just the foam I realised that the blue colour gave it a nice retro look, like the off-road bikes from late 80's and early 90's. I also have some Yamaha decals on the bike with that same blue colour.
Looking at the final result I realize that it looks a little big on the bike. I have the impression of looking at some 80 cc children's cross bike rather than a 250. It looks a bit like the padded seat they were using in the early days of Paris - Dakar, when much of the modifications were just some DIY by the riders. And when some people even completed the race on Vespas.
I didn't go for a longer ride yet, but just sitting on the bike it feels just like what I was hoping for. I'm curious to see how it will feel after an hour or two, and also how well this foam will hold up on longer term. It's not the ideal foam for this purpose, but I have also never done this type of modifications so it was a good learning experience and if I need to replace the foam later it'll be so much easier.
The only issue I have identified so far is that the rear rack I have makes it very tight to fit the seat and once in place the screws press into the cover and the foam. I'll remove the rack and ride without. I had mounted it to mount a top box on it, but I no longer need it to carry things so I can remove the rack as well.
Nice work Simo! You put a lot of time and effort into keeping the swooping seat design and I think it looks great. I can appreciate the work you put into shaping this seat. Well done!


 I waited a few minutes before starting to shape the foam.
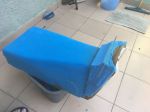
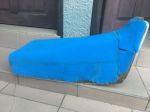
 It looks a bit like the padded seat they were using in the early days of Paris - Dakar, when much of the modifications were just some DIY by the riders. And when some people even completed the race on Vespas.