A forum for owners of Yamaha TTR250 trail and enduro bikes!

Members Login
Username 
 
Password 
    Remember Me  
Post Info TOPIC: Project Lemon..(update May 2014)


Veteran Member

Status: Offline
Posts: 33
Date:
Project Lemon..
Permalink  


This will do the job, diameter a tad larger but fits. Wire connectors need changing. cost me £12.50 at local dealers.

http://www.patternparts.net/p-Starter_Relay-37744.aspx


__________________


Super Guru

Status: Offline
Posts: 8557
Date:
Permalink  
 

Thanks for the heads up Neil. The advantage of the ORO one is that it already has the correct connector fitted for the TTR250 which saves a bit of faffing about.

Jason has agreed to test the ORO one on his TTR and we will soon find out if its up to snuff wink

Brian


__________________

Exeter, Devon, UK

http://www.ttr250.com  - The one and only dedicated TTR250 FAQ! 
 

TIP: For easy viewing bookmark the "Recent Posts" view - http://ttr250.activeboard.com/p/recent/ 


Senior Member

Status: Offline
Posts: 111
Date:
Permalink  
 

Evening all. Managed to spend a bit more time on the lemon yesterday and this evening. Whipped around to Brians place saturday and picked up this item to see if it would sort the starting issues.

20140810_143640.jpg

Bit of a fiddle getting it back in, much easier without exhaust in situ and connect red lead first..and i swapped the rubber holder over for the original. Job jobbed, i now have a starting lemon.

20140810_151232.jpg


Attachments
__________________


Senior Member

Status: Offline
Posts: 111
Date:
Permalink  
 

Forgot to take this off the old solenoid and put on the new one, gives the terminals a bit more protection from the elements, looks like you have to disconnect the wires from the block to get it off though. hmm

20140810_153524.jpg


Attachments
__________________


Senior Member

Status: Offline
Posts: 111
Date:
Permalink  
 

Next job is getting the exhaust tidied up, silencer came off ok, got some heat on the header bolts and one nut came off the stud as planned but the other one is seized on the stud and came out with it. Tried getting the other stud out using the 'two nut' method and lots of heat but no joy, giving it a good soaking with gt85 and will have another go. Probably leave it be and just put one new stud in.

20140810_163411.jpg


20140810_163939.jpg

20140810_165736.jpg20140810_180621.jpg


Attachments
__________________


Senior Member

Status: Offline
Posts: 111
Date:
Permalink  
 

Exhaust bits ready for assault.hmm

20140810_184047.jpg


Had a crack at the header first this evening..wire wool and magic potions at the ready.

20140811_162335.jpg

Header clamp got done first.

20140811_163906.jpg

20140811_172731.jpg

Header coming along..

20140811_172741.jpg

Job done, not gone for too good a shine, as its gonna get ****bound again soon, will just keep on top of cleaning it off and buffing it off regular.

20140811_191216.jpg


Attachments
__________________


Senior Member

Status: Offline
Posts: 111
Date:
Permalink  
 

Will have a crack at the silencer this week hopefully.

__________________


Super Guru

Status: Offline
Posts: 8557
Date:
RE: Project Lemon..(update 11/08)
Permalink  


Good to see steady progress being made Jason biggrin

Excellent news that the solenoid did the business and fitted straight in. I think I will add this one to our catalogue wink

Was it easy enough to straighten the cable clip that was at right angles as it comes from the factory?

Brian


__________________

Exeter, Devon, UK

http://www.ttr250.com  - The one and only dedicated TTR250 FAQ! 
 

TIP: For easy viewing bookmark the "Recent Posts" view - http://ttr250.activeboard.com/p/recent/ 


Senior Member

Status: Offline
Posts: 111
Date:
Permalink  
 

TTRfan wrote:

Good to see steady progress being made Jason biggrin

Excellent news that the solenoid did the business and fitted straight in. I think I will add this one to our catalogue wink

Was it easy enough to straighten the cable clip that was at right angles as it comes from the factory?

Brian


 Yep, a good addition for your arsenal Brian, see how it fares after a winter of laning..wink


__________________


Senior Member

Status: Offline
Posts: 111
Date:
Permalink  
 

Saw this item on the bay of evil a few days ago and thought it might be a shrewd purchase for the price..especially if the one that my sprag is sat in is worn..hmm

20140813_201834.jpg

20140813_201813.jpg

20140813_201737.jpg

It turned up today, looks to be a good spare, the boss has a bit of a shine on it but not ridged or worn.


Attachments
__________________


Super Guru

Status: Offline
Posts: 8557
Date:
Permalink  
 

A shrewd purchase indeed Jason wink


__________________

Exeter, Devon, UK

http://www.ttr250.com  - The one and only dedicated TTR250 FAQ! 
 

TIP: For easy viewing bookmark the "Recent Posts" view - http://ttr250.activeboard.com/p/recent/ 


Senior Member

Status: Offline
Posts: 111
Date:
Permalink  
 

TTRfan wrote:

A shrewd purchase indeed Jason wink


 Looks ok..!! What do you reckon about the exhaust stud Brian ? Leave it be and just replace the one ?


__________________


Super Guru

Status: Offline
Posts: 8557
Date:
Permalink  
 

I would leave the stud in there if the external thread is OK. 

In my experience the studs are a mm or so too long. The exposed end rusts and the studs usually come out with the nut held on fast with rust. Not really a problem - I just treat them as bolts wink

Brian


__________________

Exeter, Devon, UK

http://www.ttr250.com  - The one and only dedicated TTR250 FAQ! 
 

TIP: For easy viewing bookmark the "Recent Posts" view - http://ttr250.activeboard.com/p/recent/ 


Senior Member

Status: Offline
Posts: 111
Date:
RE: Project Lemon..(update 19/08)
Permalink  


So the woes of project lemon continue..! no 
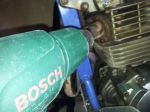
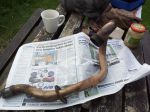
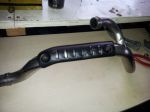
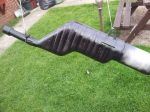
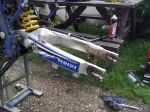
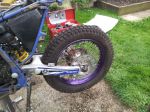
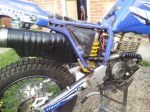
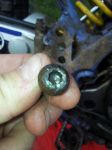
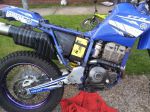
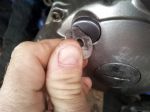
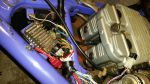
Started to sort out the silencer this evening, exhaust clamp and seal were absolutely fubar, exhaust clamp is spot welded on and getting it off did not go well. ARSE.

20140819_184751.jpg


20140819_184637.jpg

May have to dust off the fabrication skills or just source another silencer now.


Attachments
__________________


Senior Member

Status: Offline
Posts: 111
Date:
Permalink  
 

Managed to grab a few hours on the lemon today blankstare
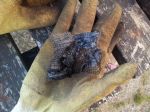
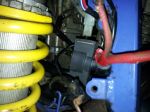
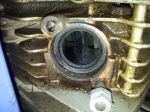
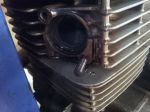
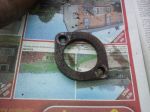
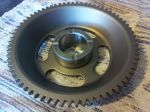
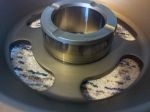
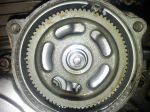
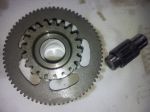
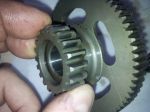
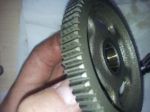
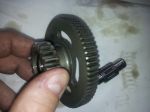
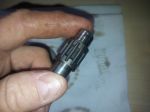
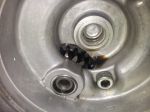
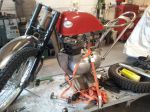
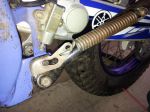
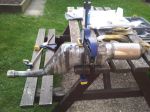
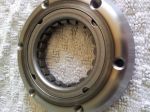
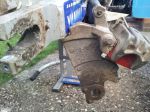
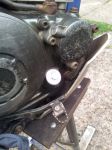
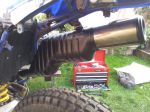
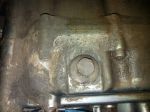
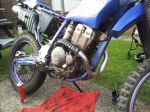
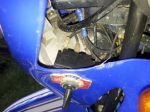
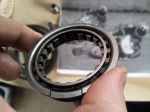
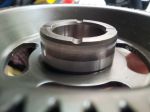
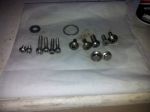
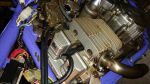
. Managed to get the seized bolt out of the starter cover and have a look at the state of things inside..i know the sprag is knackered but i was hoping thats all thats going to need replacing.

No swarf or filings found. smile

20140825_132844.jpg

All is good so far i think.

20140825_134758.jpg

Bit of a shine where it meshes onto the other cog.

20140825_134828.jpg

20140825_134843.jpg

20140825_134918.jpg

Bearing looks ok.20140825_135117.jpg20140825_135145.jpg

Didnt get round to getting the next cover off but initial look at the other teeth looks ok i think Brian..??!!

Started stripping the silencer as well, going to cut the damaged collar off and weld a new section in.

20140825_183445.jpg


Attachments
__________________


Super Guru

Status: Offline
Posts: 8557
Date:
RE: Project Lemon..(update 25/08)
Permalink  


Gears and starter pinion look fine to me Jason!

__________________

Exeter, Devon, UK

http://www.ttr250.com  - The one and only dedicated TTR250 FAQ! 
 

TIP: For easy viewing bookmark the "Recent Posts" view - http://ttr250.activeboard.com/p/recent/ 


Senior Member

Status: Offline
Posts: 111
Date:
RE: Project Lemon..(update 01/09)
Permalink  


Evening all..bit of a slow week on project lemon, picked up some bits and pieces from ttr towers on saturday, a quick visit got slightly elongated due to my two kids spotting the pool biggrin..cheers for letting them hoof themselves in Brian. Left with some starter cover bolts to replace the dairylea originals, a new oil filler cap and some exhaust parts. 

Speaking of which, before i get round to finishing off refurbing the exhaust, i had to drop it off to a mate today for a bit of repair work. Hes a bit of a wizz with metal and always has some nice projects on the go and sure enough..20140901_134443.jpg

20140901_134500.jpg

20140901_134605.jpg

20140901_135622.jpg

Beemer cafe racer is all kinds of cool and the Greeves will be a nice bike as well. Only thing i actually did to the lemon recently was to sort my floppiness out, no new parts reqd, just drill a new hole.

20140828_190538.jpg

Thats it for now, just wait to get the exhaust back and then crack on.


Attachments
__________________


Senior Member

Status: Offline
Posts: 235
Date:
Permalink  
 

Really enjoying this thread, thanks for taking the time to put it up. The BMW is sun zero cool.

__________________

Pete Brown

Keighley, West Yorkshire

'94 Yamaha TTR 250 Raid (with Open Enduro headlight, grrr...)

'54 plate Suzuki GSF 650S (Bandit)

Previously Yamaha YBR125, Yamaha TY125, Yamaha TY250


Senior Member

Status: Offline
Posts: 111
Date:
RE: Project Lemon..(update 02/09)
Permalink  


pedrosan wrote:

Really enjoying this thread, thanks for taking the time to put it up. The BMW is sun zero cool.


 No worries,cheers fella. Plenty more to come yet..no


__________________


Senior Member

Status: Offline
Posts: 111
Date:
Project Lemon..(update May 2014)
Permalink  


Bonus, got my silencer back from my metal working messiah in less than a day aww
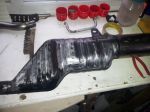
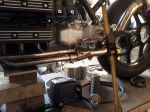
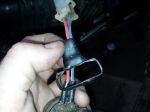
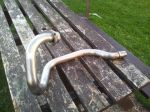
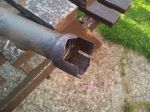
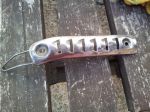
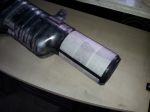
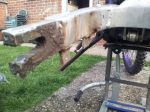
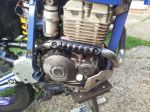
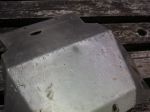
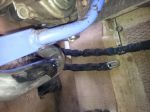
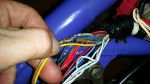
. Knackered sleeve cut off, new stainless section tacked on, all hunky dory. My man said that the pipework just behind the new sleeve was quite thin and if it ever blows he'll just make the whole section again.

 20140902_183743.jpg

20140902_183801.jpg

20140902_184539.jpg

20140902_184326.jpg

Bit more prep and get some paint back on. Had some crap results with paint that is supposedly high temp in the past. Anyone got any recommendations for a good paint finish..? Any primer or just whack it on..? B&Q bbq paint..?? Cheers all.


__________________


Super Guru

Status: Offline
Posts: 8557
Date:
RE: Project Lemon..(update 02/09)
Permalink  


Excellent job!

Regarding the paint, I use acrylic spray paint and it lasts really well. It doesn't seem to be affected by heat. As far as I can fathom out, the only section of the TTR exhaust that gets really hot is the length of pipe from the box to the header but even this doesn't seem to bother the acrylic paint.

Exhaust repair section.jpg

I think a lot of TTR exhausts are scrapped because this front section has rotted. Usually caused by the bike being put away with it wet and/or muddy.

Someone could make a few bob by offering this as a repair section. Slightly difficult to make because of the flair and the mount. But if the pipe was the same diameter as the clamp end all the way through, would that matter? It would mean reducing the depth of the fixing mount or putting in a bit more of a bend. Any volunteers? I would buy at least six if they were on offer wink

Brian


__________________

Exeter, Devon, UK

http://www.ttr250.com  - The one and only dedicated TTR250 FAQ! 
 

TIP: For easy viewing bookmark the "Recent Posts" view - http://ttr250.activeboard.com/p/recent/ 


Senior Member

Status: Offline
Posts: 111
Date:
Permalink  
 

TTRfan wrote:

Excellent job!

Regarding the paint, I use acrylic spray paint and it lasts really well. It doesn't seem to be affected by heat. As far as I can fathom out, the only section of the TTR exhaust that gets really hot is the length of pipe from the box to the header but even this doesn't seem to bother the acrylic paint.

Exhaust repair section.jpg

I think a lot of TTR exhausts are scrapped because this front section has rotted. Usually caused by the bike being put away with it wet and/or muddy.

Someone could make a few bob by offering this as a repair section. Slightly difficult to make because of the flair and the mount. But if the pipe was the same diameter as the clamp end all the way through, would that matter? It would mean reducing the depth of the fixing mount or putting in a bit more of a bend. Any volunteers? I would buy at least six if they were on offer wink

Brian


 Got a link for the paint Brian..? As regards to the repair section suggestion, i'll run it past my chap.


__________________


Veteran Member

Status: Offline
Posts: 43
Date:
Permalink  
 

I used 3 or 4 coats of Rust-Oleum Stove & BBQ Paint from B&Q on my XT and the TTR exhausts, I stays on there fine and cleans up well after getting it muddy and no problems from heat, I even painted the headers on the XT with it.


-- Edited by Chimpy on Thursday 4th of September 2014 03:37:11 PM

__________________


Senior Member

Status: Offline
Posts: 161
Date:
Permalink  
 

Excellent idea to drill another hole in the sidestand spring plate. My sidestand has wuite a bit of play and was knowking on the swingarm - I shimmed out the bush which has helped, but more spring tension will also help - I think I'll follow your idea there. Thanks.

__________________


Senior Member

Status: Offline
Posts: 111
Date:
RE: Project Lemon..(update 13/09)
Permalink  


Slow progress..shooting season has started so busy times at work..no

Got hold of some of this stuff, so pushed on with exhaust refurb.

20140908_173726.jpg

Heat shield got rubbed down and treated first.

20140906_185413.jpg


20140908_190049.jpg

Back on the header, will get some nice stainless bolts to finish it off.

20140913_184032.jpg

Finished prepping the silencer, speedclamps came in handy biggrin.

20140908_185221.jpg

Masked up the shield, couldnt be arsed taking it off and riveting it again. 

20140913_180653.jpg

Hung it in the spraybooth and got busy.

20140913_181136.jpg

20140913_182456.jpg

20140913_192202.jpg

Another coat tomorrow and jobsagoodun, sprag next...blankstare.


Attachments
__________________


Senior Member

Status: Offline
Posts: 111
Date:
RE: Project Lemon..(update 21/09)
Permalink  


Evening all, had a spare afternoon today, so had some quality time with the lemon..hmm dragged her out from the mancave and into the sun.

20140921_134331.jpg

Finally got round to picking up one of these from the bearded guru yesterday but its not getting fitted just yet..lovely bit of machine work.

20140921_132213.jpg

So the only thing i could do was get busy with the cleaning products again..no

20140921_143648.jpg

20140921_143659.jpg

20140921_143747.jpg

20140921_143816.jpg


Attachments
__________________


Senior Member

Status: Offline
Posts: 111
Date:
Project Lemon..(update May 2014)
Permalink  


Few hours with the paraffin and toothbrush and things were looking brighter.

20140921_153412.jpg

Will overhaul the caliper properly at a later date

.20140921_153432.jpg

20140921_153421.jpg

Gave the spindle and cams a going over and re-greased.

20140921_155809.jpg

20140921_164350.jpg

20140921_164404.jpg

Could only get one spacer out..?? Bit of wear on the one that did come out, replace..??

20140921_164617.jpg

20140921_165055.jpg


__________________


Senior Member

Status: Offline
Posts: 111
Date:
RE: Project Lemon..(update 21/09)
Permalink  


All back together.

20140921_171352.jpg

No split pin in the axle nut but finally found a home for an r clip that i've had floating about for years.

20140921_173813.jpg

New oil filler cap to replace the mullered original.

20140921_173244.jpg

Exhaust refurb finished a few days ago, so gave it a trial re-fit, need to get some nice stainless fixing bolts to replace the old ones.

20140920_130810.jpg

20140921_175020.jpg

20140921_175029.jpg

20140921_175041.jpg

Thats it for a few days again. Cheers all.


Attachments
__________________


Super Guru

Status: Offline
Posts: 8557
Date:
Permalink  
 

Good work Jason! I am going to have to get back to work on my refurb or you will be finishing before me wink

Regarding the spacers, the usual trick with a grooved spacer is to position the oil seal so that it runs on a flat part of the spacer.

If the lips of the seal sit over the grooves then they will allow water in and your bearings will be toast very quickly. However it looks like that trick has already been pulled on your spacer so you might need to think of another solution.

New rear spacers are now only available from Yamaha since All Balls stopped doing their kits and they are expensive cry

Brian

PS Good to see you again - hope you had a good time with the family up at Haldon. Trish was keeping me busy getting the outside ready for winter no


__________________

Exeter, Devon, UK

http://www.ttr250.com  - The one and only dedicated TTR250 FAQ! 
 

TIP: For easy viewing bookmark the "Recent Posts" view - http://ttr250.activeboard.com/p/recent/ 


Senior Member

Status: Offline
Posts: 111
Date:
RE: Project Lemon..(update 27/09)
Permalink  


Had a quick half hour with the lemon today, whipped the sump guard off as im doing the sprag next weekend, one bolt missing and the other three loose..disbelief
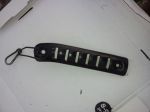
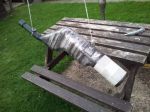
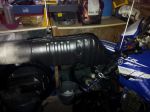
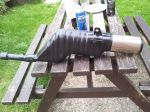
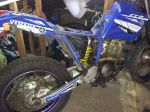
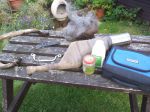
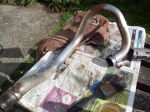
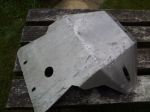
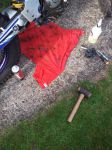
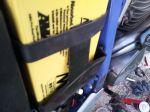
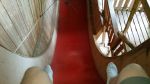
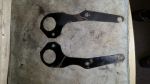
. Wouldn't ever ride without one, mine looks to have taken a few big hits and one in particular that would have done some proper damage, couldn't even knock the dent back out..blankstare

20140927_175926.jpg

20140927_180019.jpg

Looks like i'll be needing a new sump plug Brian, think the last time it was removed was with a screwdriver..no

20140927_173154.jpg

Called it a day and buggered off up to Pilsdon Pen to pray to the gods of Yamaha..confuse

20140927_132945.jpg


Attachments
__________________


Senior Member

Status: Offline
Posts: 111
Date:
Permalink  
 

Spent the afternoon with the lemon listening to the Chiefs smash Quins aww, had a crack at getting another seized bolt out from rh frame protector, so got the ttr basic toolkit out.

20140928_170638.jpg

Soon had the offending bolt out, absolutely mullered it with a screwdriver and ****ometer.

20140928_151859.jpg

Yet more grime revealed..no

20140928_151831.jpg

Toothbrush time again..

20140928_160659.jpg

Frame guard back on with replacement bolts.

20140928_162920.jpg

Put the exhaust system back on, find out if stove and bbq paint is up to the job soon..blankstare need to source better header nuts as well.

20140928_165510.jpg

20140928_165813.jpg

Put the header clamp on the header before you put the heat shield back on....confuse

20140928_165930.jpg

Re-fitted the tool tube, quite rare to still be on a ttr so i was told, i'll be cable tieing it on..wink

20140928_171320.jpg

Battery box and battery back on after a quick call to the guvnor to confirm some wiring routing and also find out what the little recess on the rhs of the box is for..aww.

20140928_181823.jpg

Battery box lid doesn't shut very well with an aftermarket battery in it.

20140928_181845.jpg

Ignition on, choke out, couple of stupid twists of the throttle..net result of a flat battery and a load of fuel pissing out the bottom of the carbatooter..does that normally happen Brian..?? Battery off again..


Attachments
__________________


Super Guru

Status: Offline
Posts: 2608
Date:
RE: Project Lemon..(update 28/09)
Permalink  


Interesting as well as amusing biggrin thanks for the mirth.

I like your confidence and "modus operandi" in positioning your spare, lime coloured emergency vehicle in the background of your shots.

Good luck on the battery charging. Remember it's red to positive.

Martyn


__________________

You're never too old to learn something stupid

East Budleigh. Devon


Senior Member

Status: Offline
Posts: 111
Date:
Permalink  
 

Cubber wrote:

Interesting as well as amusing biggrin thanks for the mirth.

I like your confidence and "modus operandi" in positioning your spare, lime coloured emergency vehicle in the background of your shots.

Good luck on the battery charging. Remember it's red to positive.

Martyn


Cheers Mart..! Got an optimate charger, so foolproof..! Best charger i have owned, had a burst pipe in bathroom a few months ago and optimate ended up completely submerged, took it apart and dried it out, still working now. 


__________________


Super Guru

Status: Offline
Posts: 8557
Date:
Permalink  
 

Good job matey - you have definitely risen to the citrus challenge wink

Ref the carb leaking, it's quite common for the float/float needle to stick open if not used for a while. A few quick daps on the float bowl with the blunt end of a screwdriver normally gets it sorted biggrinbiggrin

Brian


__________________

Exeter, Devon, UK

http://www.ttr250.com  - The one and only dedicated TTR250 FAQ! 
 

TIP: For easy viewing bookmark the "Recent Posts" view - http://ttr250.activeboard.com/p/recent/ 


Senior Member

Status: Offline
Posts: 111
Date:
Permalink  
 

Not a lot to do to the lemon until i get some more funds together for new bits. Sprag  being fitted on saturday, so got the lemon dressed ready for a van trip to a bigger mancave. 

20140929_185012.jpg

20140929_185104.jpg

20140929_185542.jpg

Need to source a new switch for heated grips as well, needs to be three way though, hi/lo/off, original one is like a joystick and have no idea if grips work anyway..no

20140929_183128.jpg


Attachments
__________________


Super Guru

Status: Offline
Posts: 8557
Date:
Permalink  
 

A great improvement Jason! Bet its good to see it all back together biggrin

Regarding the switch for the heated grips, this is what I use:

Symtecs fitted Bike2 switch.jpg


The switch is nice and clear and right in front of you. Strong but simple mounting that won't get damaged in an off. Got some spare mounts and maybe a switch if you think that may be a solution for you?

The clock to the left of the switch is one of my favourite accessories on the TTR since I lost my "enduro" bar pad which had a big LCD clock in it!

Brian


__________________

Exeter, Devon, UK

http://www.ttr250.com  - The one and only dedicated TTR250 FAQ! 
 

TIP: For easy viewing bookmark the "Recent Posts" view - http://ttr250.activeboard.com/p/recent/ 


Senior Member

Status: Offline
Posts: 111
Date:
Permalink  
 

Today is sprag day...i will be reporting this procedure this evening..if it goes well..

__________________


Senior Member

Status: Offline
Posts: 111
Date:
Project Lemon..(update May 2014)
Permalink  


Evening all, apologies for lack of lemon updates for a while, got sidetracked with my other two wheeled hobby for a while..

20141005_140808.jpg

The last time i posted here was sprag day wink, which was fairly straight forward, apart from having to blat over to the gurus cave to pick up a new gasket, gambled on the old one being ok and re-useable..disbelief. Apart from that, easy enough job. Seems like i caught it before it caused too much more damage, the old sprag looked ok when i got it out but on closer inspection you can see the wear.

20141004_150107.jpg

20141004_150113.jpg

20141004_150122.jpg

20141004_164509.jpg

20141004_171920.jpg

20141004_172005.jpg

20141004_173741.jpg


__________________


Senior Member

Status: Offline
Posts: 111
Date:
RE: Project Lemon..(update 14/11)
Permalink  


New engine plug as the old one had been abused with a screwdriver that was too small, washer is the best tool for taking these in and out.

20141005_154835.jpg

Old sprag showing wear..disbelief

20141005_141657.jpg

20141005_141730.jpg

20141005_141536.jpg

Found this at the back of shed cupboard, going to be an addition to the lemon, makes regular use of an optimate an easier job.

20141005_155339.jpg

Had some rust remover kicking about, so gave a handful of tatty fixings a nice bath wink.

20141005_164750.jpg

Came out well as usual, gotta love the vinegar biggrin.

20141005_180938.jpg


Attachments
__________________


Super Guru

Status: Offline
Posts: 8557
Date:
Permalink  
 

Great to see the progress Jason. You can't be too far off getting to ride The Lemon again eh?  biggrin

You're gonna have to get some graphics to match the name wink

Brian


__________________

Exeter, Devon, UK

http://www.ttr250.com  - The one and only dedicated TTR250 FAQ! 
 

TIP: For easy viewing bookmark the "Recent Posts" view - http://ttr250.activeboard.com/p/recent/ 


Senior Member

Status: Offline
Posts: 111
Date:
Permalink  
 

TTRfan wrote:

Great to see the progress Jason. You can't be too far off getting to ride The Lemon again eh?  biggrin

You're gonna have to get some graphics to match the name wink

Brian


 Evening guvnor, not touched the lemon for a while, been mad busy at work and got a bit obsessive about cycling again..confuse. Got a few days off for christmas and going to do a bit more to the citrus one then hopefully. Last thing i did was lash a battery to it to see if the new sprag sounded better than the old one..aww. Awful amount of white smoke billowing out from header region was not what i wanted to see and was slightly worrying..hmm..remember to take off your oxford chain thats wrapped around your header when firing up a ttr. Tw@.

20141006_163028.jpg


Attachments
__________________


Senior Member

Status: Offline
Posts: 111
Date:
Project Lemon..(update May 2014)
Permalink  


Evening all..wink  After a dark few months,  it's project Lemon time again..! Dragged the steaming pile of citrus out of the man cave and rekindled my hatred for it..smile.  It's like porcelain, lovely to look at but sod all use to anyone. Thought I'd finished the cleaning side of things but remembered that I haven't had the tank off yet..deep joy..

20150424_111255.jpg20150424_111335.jpg20150424_121222.jpg20150424_121241.jpg


__________________


Senior Member

Status: Offline
Posts: 111
Date:
RE: Project Lemon..(update April 2014)
Permalink  


I wasn't ready for this amount of cleaning again, so pissed off to Escot with v3.0 to dick about on the dropslide instead.20150425_160640.jpg

I'm 44 and still take the chance to maim myself just to impress my son. He digs a good blood injury and/or broken bones.


Attachments
__________________


Super Guru

Status: Offline
Posts: 2608
Date:
Permalink  
 

Can't beat the boy out of the man. wink

You only have one life so live it while you can.

Martyn


__________________

You're never too old to learn something stupid

East Budleigh. Devon


Super Guru

Status: Offline
Posts: 8557
Date:
Permalink  
 

Nice to meet your lad at the weekend - bit of a maths genius eh?

Here are some pics of what the (UK) wiring loom should look like - ignore the arrows!

DSCF7083.JPG

Indicator relay location.jpg


__________________

Exeter, Devon, UK

http://www.ttr250.com  - The one and only dedicated TTR250 FAQ! 
 

TIP: For easy viewing bookmark the "Recent Posts" view - http://ttr250.activeboard.com/p/recent/ 


Senior Member

Status: Offline
Posts: 111
Date:
Permalink  
 

Cubber wrote:

Can't beat the boy out of the man. wink

You only have one life so live it while you can.

Martyn


 Injured myself enough when I was a kid Mart..!!


__________________


Senior Member

Status: Offline
Posts: 111
Date:
Permalink  
 

Cheers for those pics Brian, every little helps with wiring..

__________________


Senior Member

Status: Offline
Posts: 111
Date:
Permalink  
 

Back from Escot and out with the cleaning utensils..hmm20150424_174630.jpg

20150424_174947.jpg


Attachments
__________________


Senior Member

Status: Offline
Posts: 111
Date:
Permalink  
 

The loom has revealed itself to be something more akin to a badly wired IED. 20150424_175118.jpg


Attachments
__________________


Senior Member

Status: Offline
Posts: 111
Date:
Permalink  
 

Decided the tank mounting plates were a bit scruffy, so out with the dremel and they'll get a coat of something this weekend possibly..20150426_184217.jpg

20150427_170045.jpg


Attachments
__________________
«First  <  1 2 3  >  Last»  | Page of 3  sorted by
 
Quick Reply

Please log in to post quick replies.


Create your own FREE Forum
Report Abuse
Powered by ActiveBoard