A forum for owners of Yamaha TTR250 trail and enduro bikes!

Members Login
Username 
 
Password 
    Remember Me  
Post Info TOPIC: DROWNED


Guru

Status: Offline
Posts: 932
Date:
DROWNED
Permalink  


Hey lin,

           As martyn said strip the motor and reassemble ''carefully''

Should'nt have to replace anything because of water or silt but replacing bearings might be an idea  while you have it stripped

Check specs before reassembling engine,replace anything outta spec

Not sure about the clutch puller as i made my own but i'm pretty sure you can only use the back axle for removing the rotor. See this link for details of ''special'' tools needed  ...http://www.ttr250.activeboard.com/t50122801/just-saying-hi/ 

Pic of all the tools i needed to completely strip motor....  Photo_00068.jpg


Brian will know about the 280cc kit but i think you would have to machine the casings??

If you want cheap Genuine OEM parts check out these sites  http://www.boats.net/parts/search/Yamaha/Motorcycle/parts.html and http://www.partforyamaha.com/

If you want a full pdf. repair manual pm me your email address as it is too big to fit here.

Helpfull link http://www.ttr250.activeboard.com/t43731716/modernising-a-1993-yamaha-ttr250-open-enduro/

Helpfull link... http://www.ttr250.activeboard.com/t50317644/1993-ttr250-piston-kit/

Jarrah.


-- Edited by barra8 on Monday 13th of August 2012 12:56:20 PM

__________________

YAMAHA ROCKS!!!!!!

TTR250ACTIVE''BORED'' ADDICT!

Favourite quote: To be old & wise first you must be young & dumb!

My own: Your never too young to learn an old trick! :)


Guru

Status: Offline
Posts: 932
Date:
Permalink  
 

Exactly what i was thinking but did'nt want to write so much lol,thanks Brian. Oh he did say that the guy that cleaned the engine for him had already spun the engine eg...                      A good mate on a nearby island took the bike into his care. Without going into detail he has done an amazing job of opening all the switches, electrical connectors, fuel tank, carb and starter motor and decontaminating the parts. The engine he attempted to flush using a mix of engine oil and kero, spinning it on the starter with the plug out So thats why i think maybe the bearings are shot????

I was'nt aware that you could retain the original cylinder sleeve with fitting the 280cc kit. Man the sleeve must get thin?? How many mm would that be brian?

Sorry for hijacking your thread lin lol.

Jarrah.


-- Edited by barra8 on Monday 13th of August 2012 02:03:09 PM

__________________

YAMAHA ROCKS!!!!!!

TTR250ACTIVE''BORED'' ADDICT!

Favourite quote: To be old & wise first you must be young & dumb!

My own: Your never too young to learn an old trick! :)

Lin


Senior Member

Status: Offline
Posts: 129
Date:
Permalink  
 

My 2010 TTR250 lives in the Philippines and I fly there from New Zealand every holidays.  My brother who lives there also owns an identical bike and we do a lot of trail riding and long distance riding. Returning to NZ last year I had left my bike in storage.  Unfortunately a flash flood occurred in February during a typhoon and my bike was immersed in silty floodwater to a depth of 2m above the seat.  When the waters receded the bike had to sit for a week before a recovery operation could be undertaken.  A good mate on a nearby island took the bike into his care. Without going into detail he has done an amazing job of opening all the switches, electrical connectors, fuel tank, carb and starter motor and decontaminating the parts. The engine he attempted to flush using a mix of engine oil and kero, spinning it on the starter with the plug out, changing the oil and filter umpteen times. 

On arrival over there in June this year my suspicions were correct - the engine was still silt contaminated.  I removed it from the frame and shipped it back to New Zealand.  I have great respect for my mate and the local Philippine mechanics but parts for TTR would have to be imported, and the Philippine Customs are worse than the Taliban.  After great efforts dealing with shipping, NZ Customs and Biosecurity the engine now resides in my workshop awaiting a strip-down.

Some questions.

1. Has anybody had to decontaminate a TTR engine that has been filled with silted water?  If so, what was encountered?

2. Anybody have any knowledge of what effect this immersion will have on the ignition pick-up?  Should I replace it?

3.  Replace the clutch plates?  Oil pump?  

4.  Any other advice?

5.  Is the clutch puller 18mm x 1.25?  (My rear axle bolt is in the Philippines....)

I'm tempted to do a big-bore while it's in bits, but not the 325cc.  Anybody had any experience of the so-called 280cc kit?


__________________


Super Guru

Status: Offline
Posts: 2608
Date:
Permalink  
 

What rotten luck. no

I'm afraid that all I can offer are my commiserations, Lin. cry

I think that you will have to strip the engine down to big lumps and check, clean, rinse, lubricate and reassemble - CAREFULLY! bleh

I had my TTR submerged in a river once but by your example mine was only slightly dampened.

I hope you manage well and get your TTR running again with the least possible expense and delay.

Martyn


__________________

You're never too old to learn something stupid

East Budleigh. Devon


Super Guru

Status: Offline
Posts: 8566
Date:
Permalink  
 

Lin wrote:

Some questions.

1. Has anybody had to decontaminate a TTR engine that has been filled with silted water?  If so, what was encountered?

2. Anybody have any knowledge of what effect this immersion will have on the ignition pick-up?  Should I replace it?

3.  Replace the clutch plates?  Oil pump?  

4.  Any other advice?

5.  Is the clutch puller 18mm x 1.25?  (My rear axle bolt is in the Philippines....)

I'm tempted to do a big-bore while it's in bits, but not the 325cc.  Anybody had any experience of the so-called 280cc kit?


 Bad luck Lin. I think I saw a pic of the height the water reached on the building where your TTR was stored.

You are fortunate that the engine wasn't run so, unless rust has set in, I reckon a darn good wash out and rinse might do it. Find a parts washer and leave the pump running to rinse it out for as long as you can.

After the rinse, blow out with an airline (don't spin up the bearings!), give the casings and bearings a good spray of WD40 and (with your fingers crossed) turn each of the bearings and see if you feel any roughness. If not, then I would be tempted to try it as it is.

My guess is that most of the internal parts will not have lost their covering of oil as the water wouldn't have been in motion so I reckon your pick up and stator will probably be OK.

The oil pump would likely to have been full of oil and probably hasn't got silt in. Again, wash it out and see if it turns without any gritty sensation.

Clutch plates should be OK as they would have been soaked on oil and repellerd the water hopefully.

The flywheel puller is quite cheap from new as it is only a bolt - not sure if it is 18mm x 1.25mm or 1.5mm. I got the info somewhere but can't find it at the moment.

The "280" engine is very nice and seems to have a bit of extra grunt but the only real test would be on a dyno. The downside is the cost of the extra boring needed. The cases don't need boring as the standard liner stays in use. I guess the downside is that if you do need a rebore in the future then there is nothing left and you will need to source a s/h barrel or fit a new liner.

Hope that helps.

Brian


__________________

Exeter, Devon, UK

http://www.ttr250.com  - The one and only dedicated TTR250 FAQ! 
 

TIP: For easy viewing bookmark the "Recent Posts" view - http://ttr250.activeboard.com/p/recent/ 


Super Guru

Status: Offline
Posts: 8566
Date:
Permalink  
 

Ah - yes - read Lin's post again and the engine has been turned over with silt in the bearings.

I was thinking of how I dealt with a silted engine. I broke the engine down without running it and washed it as described. 

Sounds like a lot more work will be needed then cry

Brian


__________________

Exeter, Devon, UK

http://www.ttr250.com  - The one and only dedicated TTR250 FAQ! 
 

TIP: For easy viewing bookmark the "Recent Posts" view - http://ttr250.activeboard.com/p/recent/ 


Super Guru

Status: Offline
Posts: 8566
Date:
Permalink  
 

Haggis Hunter wrote:


TTRfan wrote:

The flywheel puller is quite cheap from new as it is only a bolt - not sure if it is 18mm x 1.25mm or 1.5mm. I got the info somewhere but can't find it at the moment.


 I used a M18x1.5 spark plug chasing tool for pulling the flywheel and I think I used the same for the clutch when I had to replace the timing chain. I can't think who recommended to use the chaser. Was it in the FAQ's?

It worked well with a impact wrench

I will just add check the thread size in the clutch. I had to pull the flywheel to change the sprag clutch for which I can remember using the chasing tool and I had the clutch off but cannot remember how I got it off. I know I didn't use the rear axle.

Sorry to be a bit vague on this it was quite a few years agoconfuse


Peter


 Yep - it was in the FAQ! " What I found that worked great is a spark plug thread cleaner made by KD tools part #730 it has a 18mm x 1.5mm on one end (that's the size needed for the flywheel) and a 14mm x 1.5mm on the other end, it's made from hardened metal. "

You don't need a puller to get the clutch off just something to stop the basket turning whilst you undo the big nut wink

Here is a pic and the dimensions if you want to make up a clutch holder else I can supply one for £9.50 inc p&p within the UK.

Brian

Clutch holding tool.jpg


__________________

Exeter, Devon, UK

http://www.ttr250.com  - The one and only dedicated TTR250 FAQ! 
 

TIP: For easy viewing bookmark the "Recent Posts" view - http://ttr250.activeboard.com/p/recent/ 


Veteran Member

Status: Offline
Posts: 66
Date:
Permalink  
 

Ah.... another tool for the collectionbiggrin     
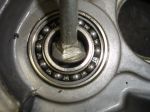
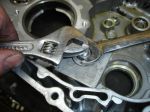
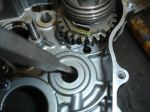
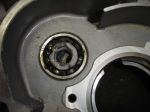
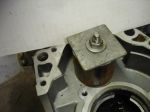
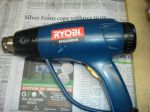
I would have got the clutch nut off with the air wrench so would not have had the problem of holding it. It was quite a few years ago that I did all that so my memory is a bit (read: VERY) cloudyconfuse


 I hope it was fresh water and not salt water. I remember fitting a new 6cyl diesel engine in a work boat on a Friday. Other people were working on the boat on the Saturday morning. They left a sea **** open by accident and when the tide came in the boat filled with waterno On Monday morning we got a call to come and remove the engine and strip it to check it over. The only things that could be saved were the block, head, crank and sump. Everything else could not be saved. We were all a bit surprised by this.

So on that depressing note.

Good luck Lindsay. Hope the damage is not too bad and that it's soon up and runningsmile


Peter


-- Edited by Haggis Hunter on Monday 13th of August 2012 10:06:08 PM

__________________


Super Guru

Status: Offline
Posts: 8566
Date:
Permalink  
 

barra8 wrote:

I was'nt aware that you could retain the original cylinder sleeve with fitting the 280cc kit. Man the sleeve must get thin?? How many mm would that be brian?


 Only a couple of mm left on the sleeve - see http://ttr250.activeboard.com/t43731716/modernising-a-1993-yamaha-ttr250-open-enduro/?page=1&sort=oldestFirst and my 9 July message for pics.

Brian


__________________

Exeter, Devon, UK

http://www.ttr250.com  - The one and only dedicated TTR250 FAQ! 
 

TIP: For easy viewing bookmark the "Recent Posts" view - http://ttr250.activeboard.com/p/recent/ 


Veteran Member

Status: Offline
Posts: 66
Date:
Permalink  


TTRfan wrote:

The flywheel puller is quite cheap from new as it is only a bolt - not sure if it is 18mm x 1.25mm or 1.5mm. I got the info somewhere but can't find it at the moment.


 I used a M18x1.5 spark plug chasing tool for pulling the flywheel and I think I used the same for the clutch when I had to replace the timing chain. I can't think who recommended to use the chaser. Was it in the FAQ's?

It worked well with a impact wrench

I will just add check the thread size in the clutch. I had to pull the flywheel to change the sprag clutch for which I can remember using the chasing tool and I had the clutch off but cannot remember how I got it off. I know I didn't use the rear axle.

Sorry to be a bit vague on this it was quite a few years agoconfuse


Peter


__________________


Veteran Member

Status: Offline
Posts: 66
Date:
Permalink  
 

I can't think who recommended to use the chaser. Was it in the FAQ's?
Yes it wassmile
Peter


__________________
Lin


Senior Member

Status: Offline
Posts: 129
Date:
Permalink  
 

To everybody who has responded - a big thanks. The strip-down is scheduled for next week, this week I have some work to do on a Toyota RAV4 I bought for the missus.

Despite being acutely aware of my limitations when using a camera I will attempt to record the event and post the results.

Again, thanks to all.

Cheers

Lindsay

__________________


Super Guru

Status: Offline
Posts: 8566
Date:
Permalink  
 

Any progress Lin?

I have just heard from a TTR owner in the Philippines who also had his TTR soaked under water for over 3 days.

I am going to send him a link to this thread so he might learn from all the advice. 

Brian


__________________

Exeter, Devon, UK

http://www.ttr250.com  - The one and only dedicated TTR250 FAQ! 
 

TIP: For easy viewing bookmark the "Recent Posts" view - http://ttr250.activeboard.com/p/recent/ 

Lin


Senior Member

Status: Offline
Posts: 129
Date:
Permalink  
 

Planning to start the strip this coming Sunday. I have obtained an M18 x 1.5 bolt to use as a flywheel puller and have almost finished making a cunningly devised tool to hold the gearbox sprocket so I can undo the nut.


Cheers

Lindsay

__________________


Guru

Status: Offline
Posts: 932
Date:
Permalink  
 

Hey lin,

             Glad nothing was majorly wrong and all seemed as expected. I have a spare camshaft that i'm not going to be using if you want it. Not sure how you would pay for postage though.

If you want to give me say AU $10 on top of the postage it will cover the work i have to do to send it. I have two but one has a small mark on it. They are both the same so you can use either one but the good one is the inlet side.  It is measured at 32.77 mm but think its closer to 32.8 . Heres a few pics if you want to see sorry the pics are so bad no


Jarrah.


-- Edited by barra8 on Friday 28th of September 2012 05:59:39 PM

__________________

YAMAHA ROCKS!!!!!!

TTR250ACTIVE''BORED'' ADDICT!

Favourite quote: To be old & wise first you must be young & dumb!

My own: Your never too young to learn an old trick! :)

Lin


Senior Member

Status: Offline
Posts: 129
Date:
Permalink  
 

TTRfan wrote:
Lin wrote:

have almost finished making a cunningly devised tool to hold the gearbox sprocket so I can undo the nut.


 threadbetterwithpics.gif


That sounds interesting Lin. I haven't found a really safe way of doing that. I wedge the sprocket with a socket but its fiddly.


Despite being interrupted by mates calling with mechanical problems and wives wanting to go shopping I finally managed to start the strip down.  I have got the head and barrel off.

TOOL.JPG

About 300mm (12in) of 520 chain welded to a length of water pipe.  Need to grind off the outer circumferance a bit to allow easy fitting.  Works a treat, no risk of damage.

DSC00077.JPG

Something I learned years back, this white marker ink will survive 500,000km on the conrod of a heavy duty diesel engine.  

DSC00071.JPG

Great for preventing senior moments during reassembly.

DSC00080.JPG

Looks like I'll need a new intake cam.

DSC00082.JPG

Cam bearings ok... phew!

DSC00093.JPG

That marker again.

DSC00095.JPG

Piston looks ok.

DSC00097.JPG

Barrel stained quite badly.  It may clean up with a light honing.  However I am tempted to do the 2mm overbore and fit the Wiseco piston to bring the engine up to 263cc.

Today is a day off so will attack the crankcase.  So far so good.


__________________


Veteran Member

Status: Offline
Posts: 66
Date:
Permalink  
 

Looks like you dodged the bullet there Linsmile

FWIW, I use an impact wrench for undoing the sprocket nut. With the chain still on and the back wheel on the ground it comes off a treat.


Hope the bottom end is ok.


Peter


__________________


Super Guru

Status: Offline
Posts: 8566
Date:
Permalink  
 

Thanks for the pics Lin smile 

Shopping eh? I behave so badly in town that I no longer get dragged along biggrin

I like the idea of the sprocket holder. Good for when working in the garage late at night and not disturbing the neighbours by starting up the rattle gun! You probably haven't got anyone living within 50 miles of you Peter wink

The piston looks mint but there seems to be quite a bit of blowby between the 1st and 2nd rings, plus staining below the 2nd ring, which means at the very least you need a new set of rings. The only downside to going to the biggest oversize is that you have nowhere to go if problems arise other than source another barrel or resleeve. That said, my "280" is full of beans.

Is the inlet cam pretty well pitted or might it clean up? 

Brian


__________________

Exeter, Devon, UK

http://www.ttr250.com  - The one and only dedicated TTR250 FAQ! 
 

TIP: For easy viewing bookmark the "Recent Posts" view - http://ttr250.activeboard.com/p/recent/ 

Lin


Senior Member

Status: Offline
Posts: 129
Date:
Permalink  
 

Yes the sprocket holder works well and is not confined to TTRs, can be used on any bike with 520 chain. I have a rattle gun and neighbours too, one of them starts his saw bench up at night so any noise I make with my rattle gun is regarded as a minor infraction.

Yes the piston is showing some top ring blowby. I'm putting that down to the fact the engine has only done 3000km and not yet "sealed up". The honing pattern is still visible in the bore (the portions not covered in corrosive staining)

Agreed, going to 2mm over leaves no room for another "event". However if the air filter is properly serviced and the oil changed religiously the barrel/piston relationship should not be a source of problems. I hope.

I had a go at cleaning up the inlet cam with some scotchbrite but it's deeply pitted. I don't subscribe to the "pits just hold oil" theory especially in the mixed lubrication regime the camshaft lobe operates in. Replacement cam is needed. Interestedly the cam followers are unmarked.

Lindsay

__________________
Lin


Senior Member

Status: Offline
Posts: 129
Date:
Permalink  
 

Continuing the saga...

DSC00101.JPG
Corrosion on the piston pin.  I've pretty much decided I'll do a 2mm overbore anyway.
DSC00102.JPG
I was never much of an art student...
DSC00103.JPG
Oil filter did what it's supposed to.
DSC00109.JPG
The oil pump, against all my expectations, was in remarkable condition showing only minor abrasive damage on the drive spindle.  
DSC00106.JPG
DSC00110.JPG
Oil pickup strainer was also working overtime....
DSC00111.JPG
My flywheel puller in action.  A dab of moly grease on the threads and end help to reduce galling.  Flywheel came of with a light tap on the bolt head.
With any luck I will split the crankcase one night this week.  So far the damage is not as bad as I suspected.  The flywheel needle roller bearing and the starter gear rollers were in excellent condition, giving me quiet hope the conrod bearing will be the same....  Fingers crossed.


-- Edited by Lin on Monday 27th of August 2012 07:34:33 AM

__________________
Lin


Senior Member

Status: Offline
Posts: 129
Date:
Permalink  
 

Giday Jarrah

I'll send you a private message through the forum email about that cam.

Cheers

Lindsay


__________________


Veteran Member

Status: Offline
Posts: 66
Date:
Permalink  
 

TTRfan wrote:

I like the idea of the sprocket holder. Good for when working in the garage late at night and not disturbing the neighbours by starting up the rattle gun! You probably haven't got anyone living within 50 miles of you Peter wink


 All my neighbours seem to smoke a strange brand of tobacco and see and hear things I don't.

So any noise I make is put down to the fairiesbiggrin

Peter


__________________
Lin


Senior Member

Status: Offline
Posts: 129
Date:
Permalink  
 

I could send you a recording of my neighbour's sawbench in action. He cuts large hard thick plastic panels. Dozens of them. Your neighbours would have the loudest fairies in the garden.

__________________


Veteran Member

Status: Offline
Posts: 66
Date:
Permalink  
 

Loud fairies are good, I can blame all the noise from my workshop on them biggrinbiggrinbiggrin


__________________


Super Guru

Status: Offline
Posts: 8566
Date:
Permalink  
 

The grease method sounds interesting Martyn but, knowing my luck, I would give the punch a whack and get sprayed in grease forced up between the bearings no

A knowledgable mate has replied to my email - shame the type he suggests - see here - is so much more expensive:

It will depend on where the bearing is! If it is needle type in a blind hole the kit shown won't work Also, if a ball race, only backed by an aluminium case, you may have problems as the extractor screw has to push against something and could punch hole in the case!

I think the better ones are the expander ones, used with a slide hammer to extract the bearings. it is easy to make up the slide hammmer part if not in a kit.


__________________

Exeter, Devon, UK

http://www.ttr250.com  - The one and only dedicated TTR250 FAQ! 
 

TIP: For easy viewing bookmark the "Recent Posts" view - http://ttr250.activeboard.com/p/recent/ 

Lin


Senior Member

Status: Offline
Posts: 129
Date:
Permalink  
 

Got off work early so managed to get the crankcase split.....

DSC00112.JPG

The trusty universal puller.

DSC00113.JPG

Very gentle tap with the smallest rubber hammer I have.  Ahhh... opening up.

DSC00118.JPG

Discomforting....

DSC00122.JPG

Finally in bits.

So far only a cursory inspection as the missus was calling me for tea.

Apart from the mud, one crankshaft bearing, both balancer bearings and both cluster shaft bearings felt pretty ropey. They may improve with a wash up and lubricant but I won't muck around with it, I'll replace all the ball bearings in the crankcase.

The con rod bearing feels really very good.  The question is - do I go to the trouble of having the crankshaft disassembled...?

And another question - any suggestion on an easy way to pull the cluster shaft bearings out of their blind holes?


__________________


Super Guru

Status: Offline
Posts: 8566
Date:
Permalink  
 

I think this could become THE engine rebuild thread Lin - great stuff!

I know its a pain having to stop and take pics as you go along but I assure you there are lots of owners that will be reading the thread and (a) it will help in their own rebuilds and (b) might give a nervous owner the courage to have a go themselves wink

I am also interested in a solution to pulling blind bearings. There are several different types available on eBay - see here - but are any of them any good? I am not sure how the sizing works and it would be very annoying to buy an expensive set of kit to find it wouldn't pull the TTR-specific bearings.

Another thought is that, if you aren't going to make a habit of rebuilding engines, you just take the cases along to your nearest m/c shop and get them to do it?

Maybe a suitably-sized Rawlbolt could be used to grip on the inner bearing race but some sort of slide hammer would be needed to fasten to it and get the bearing out.

Hopefully we have an engineer reading this that can give a reliable response.

Brian


__________________

Exeter, Devon, UK

http://www.ttr250.com  - The one and only dedicated TTR250 FAQ! 
 

TIP: For easy viewing bookmark the "Recent Posts" view - http://ttr250.activeboard.com/p/recent/ 

Lin


Senior Member

Status: Offline
Posts: 129
Date:
Permalink  
 

The worst part about doing pics during an engine strip is that the camera gets oily and I have to wipe it off with paper tissues when I take it back into the house.

Pulling bearings from blind holes; thought I'd throw that one out to see what comes back.  I have a few tricks of my own....


__________________


Super Guru

Status: Offline
Posts: 2608
Date:
Permalink  
 

A ThumperTalk thread suggests this method:-

If you dont have a puller, you can use this trick if you are desperate. It worked when I had to get the throw out bearing out for my clutch in my toy pickup.
Using a thick grade grease, fill the cavity behind the bearing full of grease by going through the middle of the bearing. When the cavity of space behind the bearing is entirely full of grease, you need to find a circular rod that fits snuggly but not tight, inside the inner hole of the bearing. Tap the rod with a hammer, and since the cavity behind the bearing is full of grease, it pushes the grease against the bearing and dislodges it out to you.
Make sense?

Martyn


__________________

You're never too old to learn something stupid

East Budleigh. Devon

Lin


Senior Member

Status: Offline
Posts: 129
Date:
Permalink  
 

Cubber wrote:

A ThumperTalk thread suggests this method:-

If you dont have a puller, you can use this trick if you are desperate. It worked when I had to get the throw out bearing out for my clutch in my toy pickup.
Using a thick grade grease, fill the cavity behind the bearing full of grease by going through the middle of the bearing. When the cavity of space behind the bearing is entirely full of grease, you need to find a circular rod that fits snuggly but not tight, inside the inner hole of the bearing. Tap the rod with a hammer, and since the cavity behind the bearing is full of grease, it pushes the grease against the bearing and dislodges it out to you.
Make sense?

Martyn


Works well for bronze bushes.  Sometimes works for Torrington bearings (encapsulated needle rollers)  Never works for ball races (unless shielded type)


-- Edited by Lin on Wednesday 29th of August 2012 07:27:04 PM


-- Edited by Lin on Thursday 30th of August 2012 07:41:23 PM

__________________


Super Guru

Status: Offline
Posts: 2608
Date:
Permalink  
 

If the old bearing is foobarred and its centre is removed you would be left with the outer race in a blind hole. aww

This method may work then, maybe. thumbsup.gif

I've replaced the blind bearings in my old pre-unit T100 with this method, but they were a phospher bronze bushes, not a load of balls!

Martyn


__________________

You're never too old to learn something stupid

East Budleigh. Devon


Veteran Member

Status: Offline
Posts: 66
Date:
Permalink  
 

I have some of those bearing removers, the expanding ones which I use with a slide hammer. They work ok.

Another method I heard of when I was at collage ( this was some time ago and the method described to me was used in the 1940's) The engineer was faced with having to remove a bearing in a blind hole but had no specialist tools but did have access to an old lathe. He machined a taper with a steep angle onto a piece or bar that just slid into the centre of the bearing. He drilled through the centre of the cone and threaded the hole. In this hole he screwed a length of studding. The cone was placed into the centre of the bearing and a handful of ball bearings dropped in the hole on top of the cone.

A flat bar with a hole drilled in it to clear the studding, was placed over the studding. A couple of spacers were placed between the bar and the casting each side of the bearing.

A nut was put on the studding and tightened, this pulled the cone against the ball bearings which locked against the old bearing and the old bearing was removed.

I guess there must have been a bit of clearance between the bearing and the case to allow the balls to get between the cone and the race.

I suspect that the bearing was a little bit bigger than anything in the TTR engine.

But it may (or may not) get the grey matter working and you will come up with a solution. If not, crack a cold one for inspiration beer.gif


Peter


__________________


Guru

Status: Offline
Posts: 932
Date:
Permalink  
 

All great ideas above good work fella's,

                                                        If it was me (for the sake of the hassle) i would just buy an upgraded crankshaft. I saw one somewhere but can't remember where.

It costed about $160.00 but aint too bad considering. Sorry i can't be be more specific but if i find where i found it for sale (brand new) i will let you know if you want to go down that road.

On the removing the crankshaft bearing subject my idea is to

...................................................................................................................................................................................................................................................................

Use a short ''stout''piece of threaded rod with a nut welded to the end.

Note: When you weld the thread to the short threaded nut you must leave a bit of thread sticking out the end so you can get a spanner on it easy enough.

The other side is a ''long'' nut which threads all the way on untill it is ''flush'' (or thereabout)with the end of the threaded rod.

Now you put the it between the crankshaft

When both nuts are held with a spanner undo the thread

 When the thread ''undo's'' it forces the crankshaft apart.

You will have to do it bit by bit either side to make sure it comes out straight.

I have done this before with other bikes and it's simple (although not sure how simple this method is to understand from this)and works.

If your stuck for idea's you could try this.

Jarrah.


-- Edited by barra8 on Thursday 30th of August 2012 07:55:17 AM

__________________

YAMAHA ROCKS!!!!!!

TTR250ACTIVE''BORED'' ADDICT!

Favourite quote: To be old & wise first you must be young & dumb!

My own: Your never too young to learn an old trick! :)


Guru

Status: Offline
Posts: 932
Date:
Permalink  
 

Hey lin,

            Just wondering if you understood my post above?confuseIt is a very basic and effective way of removing it & bonus being it's free (or the price of the bolts/nuts/welding)

I would have liked to have gone further but it is 8.30pm here and already did some grinding to the ''washer'' headed bolt in pic below. God bless the neighbours biggrin

Note: Weld the nut to the bolt before you ''Maneuver' it in the crankshaft


It's up to you what method you use so whatever method you you choose will be up to you of course.


Jarrah.


-- Edited by barra8 on Friday 28th of September 2012 06:01:22 PM

__________________

YAMAHA ROCKS!!!!!!

TTR250ACTIVE''BORED'' ADDICT!

Favourite quote: To be old & wise first you must be young & dumb!

My own: Your never too young to learn an old trick! :)

Lin


Senior Member

Status: Offline
Posts: 129
Date:
Permalink  
 

Haggis Hunter wrote:

I have some of those bearing removers, the expanding ones which I use with a slide hammer. They work ok.

Another method I heard of when I was at collage ( this was some time ago and the method described to me was used in the 1940's) The engineer was faced with having to remove a bearing in a blind hole but had no specialist tools but did have access to an old lathe. He machined a taper with a steep angle onto a piece or bar that just slid into the centre of the bearing. He drilled through the centre of the cone and threaded the hole. In this hole he screwed a length of studding. The cone was placed into the centre of the bearing and a handful of ball bearings dropped in the hole on top of the cone.

A flat bar with a hole drilled in it to clear the studding, was placed over the studding. A couple of spacers were placed between the bar and the casting each side of the bearing.

A nut was put on the studding and tightened, this pulled the cone against the ball bearings which locked against the old bearing and the old bearing was removed.

I guess there must have been a bit of clearance between the bearing and the case to allow the balls to get between the cone and the race.

I suspect that the bearing was a little bit bigger than anything in the TTR engine.

But it may (or may not) get the grey matter working and you will come up with a solution. If not, crack a cold one for inspiration beer.gif


Peter


If not, crack a cold one for inspiration beer.gif


Now THAT shows deep insight into the matter and I shall do so without delay.


__________________
Lin


Senior Member

Status: Offline
Posts: 129
Date:
Permalink  
 

Hi Jarrah

Understand your idea but haven't yet decided if I will disassemble the crank. Your idea is interesting and may work well.  However the reassembly is open to question.  When completed the assembly should be checked for axial concentricity, straightness and correct conrod side clearance.  I don't have the necessary gear for doing that so I will use a specialist.  


-- Edited by Lin on Thursday 30th of August 2012 08:17:50 PM

__________________


Guru

Status: Offline
Posts: 932
Date:
Permalink  
 

Hey lin,

            If you don't have access to a press it would be advisable to leave it to a specialist cry

Hope you have your bike going soon mate.

I can't wait until my bike is back on the road,it's been three mths now and will be just about a complete rebuild once it's done no

Sounds like you might have it on the road before me or round about the same time.

Well good luck with it hope your camshaft arrives soon.

Jarrah.


__________________

YAMAHA ROCKS!!!!!!

TTR250ACTIVE''BORED'' ADDICT!

Favourite quote: To be old & wise first you must be young & dumb!

My own: Your never too young to learn an old trick! :)

Lin


Senior Member

Status: Offline
Posts: 129
Date:
Permalink  
 

Tonight I managed to get into the garage and remove some bearings.

First, the dreaded cluster shaft bearing in the blind hole....

DSC00141.JPG

First I ground two flats on the threaded end of an 8mm coach bolt.  (sorry about the focus)

DSC00128.JPG

Then I ground two flats on the coach bolt so it slips in behind the inner race.  Next...

DSC00142.JPG

I slipped a piece of 2in water pipe over the bolt and added a couple of washers.  Holding the coach bolt on the ground flats I turned the nut.  Bingo...!  Bearing came out like a rat running up a drainpipe.

DSC00143.JPG

The tool....

DSC00126.JPG

Crank bearings came out no problems.  Support the case well on a solid wood block place over a leg of the workbench if possible. Alternate your way around the bearing, one hit at a time.  I don't like using hardened punches on bigger bearings, I use an old socket set extension with the square cut off.  Hard enough but softer than a bearing.  I still have a splinter of metal in my ribcage from many years back striking a big bearing with a hard punch....

DSC00145.JPG

Other side cluster shaft bearing came out without problems.  Small bearing and I'm using a hard punch here due to space limitation.

DSC00144.JPG

And here's the next challenge, the right side balance shaft bearing.  Not enough space behind it to use the coach bolt puller.  There is a hole at back but too far off-set to punch the bearing squarely.  What to do....?


Watch this space....


-- Edited by Lin on Friday 31st of August 2012 08:55:51 AM

Attachments
__________________


Veteran Member

Status: Offline
Posts: 66
Date:
Permalink  
 

Well done with that blind one.  See, it works!  Cold beer.gif = inspiration.

Now for the other one wink

Peter


__________________
Lin


Senior Member

Status: Offline
Posts: 129
Date:
Permalink  
 

Well, back on the case... so to speak.

DSC00165.JPG

After several cold ones and much thought I decided to seize the problem with both hands and weld a coach bolt to the inner race.  

Thus allowing a spacer and washer/nut combination to extract the bearing.....

DSC00167.JPG

Like so...

DSC00168.JPG

Alors!  The bearing is not showing any sign it wants to move.

Deciding to strike while the iron (bearing) was hot, I reversed the case and again applied a punch through the

off-set hole at the back of the bearing.

DSC00169.JPG

This time it moved!  Not much though, about 2mm. But enough to get another modified coach bolt into the

back of the inner race.

DSC00170.JPG

Another spacer, washers and a nut.

DSC00171.JPG

Bingo!  All bearings out of the crankcase.  No damage.

Now to start washing parts.

I have decided to have the crank assembly stripped by HPE Engineering, one of the best equipped specialist shops in the

country. I'll replace the conrod bearing regardless of it's appearance.  I'll also have the barrel bored 2mm O/S by these

guys to fit the Wisco piston I ordered off EBay.

http://www.hpeas.co.nz/

If I had to do this again I'd heat the case in the oven to 100deg.  Then supporting it on a solid wood block I'd again apply a

punch to the back of the bearing through the off-set hole and just move the bearing a couple of mm.  

Pretty sure it will do this before it fractionally tilts and "wedges". But it will move enough to allow a modified coach bolt puller

to be inserted and the bearing pulled out.

Hindsight is a 20/20 thing.


-- Edited by Lin on Sunday 2nd of September 2012 02:47:04 AM

Attachments
__________________
Lin


Senior Member

Status: Offline
Posts: 129
Date:
Permalink  
 

Haggis Hunter wrote:

Well done with that blind one.  See, it works!  Cold beer.gif = inspiration.

Now for the other one wink

Peter


 Well I had several cold ones at the local last night.  Inspiration came, I slept on it, ....damn, what was that idea?


__________________


Super Guru

Status: Offline
Posts: 2608
Date:
Permalink  
 

Well done Lin.

Your middle name must be Percy. confuse

Percy Verence will accomplish many difficult tasks. biggrin

It's amazing what troubles a bit of mucky water makes. On first looks it looked that not much trouble would be had and a quick drying out or drip-drying would suffice.

Thanks for the catalogue and pictures.

Martyn


__________________

You're never too old to learn something stupid

East Budleigh. Devon

Lin


Senior Member

Status: Offline
Posts: 129
Date:
Permalink  
 

The Crankshaft

The decision to take it to HPE Engineering proved to be correct.

DSC00155.JPG

Corrosion damage in rod.

DSC00153.JPG

And the same on the pin.

The conrod side thrust washers were also damaged.

More follows....


Attachments
__________________
Lin


Senior Member

Status: Offline
Posts: 129
Date:
Permalink  
 

Today I had a day off so retreated to the workshop to continue the work.  All crankcase bearings, seals and O rings will be replaced - with two exceptions:

DSC00160.JPG

The starter gear bearings.  They are like new, washed them, blew them out and sprayed with WD40.  They run smooth.  One side looks to be a right little horror to remove, in a blind hole with minimal back clearance to get a tool behind it.  Part of a job is knowing when Not to tempt fate...

DSC00162.JPG

The clutch shaft bearing.  Again a difficult little soul and without the correct extracting tool damage can happen.  Washed, checked, feels fine.  It's lightly loaded and with a new seal will survive.

DSC00177.JPG

The gear cluster washed up and checked, no obvious damage or corrosion.

DSC00172.JPG

The engine cases washed and inspected, all seems well.

DSC00161.JPG

Wonderful stuff for removing old gaskets and jointing compound.  Spray it on and the gasket just falls off.  The case gasket surfaces are narrow and precision machined, so any damage from a gasket scraper could cause oil leaks.  However it is very unkind to paint so wipe it off the outside if it spills off the gasket surface.


I priced bearings from the Yamaha dealer.  The crankshaft bearings were $NZ111 each (GBP58.33)  Extortion! The original bearings were marked 63/28-3.  A 63/28 is a very common automotive bearing, and an educated guess tells me the -3  is Yamaha's way of disguising a C3 bearing (additional oil clearance for hot operating temperatures)  So my friendly bearing supplier came up with two for $30 each (GBP15.22) and he could supply all other bearings.  In all a complete crankshaft and transmission bearing replacement has cost $NZ163.47 (GBP82.96)

I have compiled a list of 24 other needed items - gaskets, seals, con rod, crankpin etc.  The list contains the Yamaha part numbers and part names, and is available to anyone wanting it.  I also have a list of the bearing numbers and they can be bought at a bearing supplier.

PISTON.JPG

The 2mm O/S Wiseco piston will give the engine 263cc.


More to follow....


-- Edited by Lin on Monday 10th of September 2012 06:25:52 AM

Attachments
__________________
Lin


Senior Member

Status: Offline
Posts: 129
Date:
Permalink  
 

Events (and a parts order that had to be filled from Japan) had conspired to delay the start of my rebuild.

Finally I have all the parts I need (fingers crossed...)  Today I collected the crankshaft assembly from HPE Engineering.  The manual

gives a fairly wide-spread spec for the rod side clearance - 0.35~0.85mm.  I measured 0.49mm so I happy with that.  The new rod, crankpin, bearing

and thrust washers cost NZ$429 (GBP217.85)

DSC00196.JPG

HPE Engineering charged NZ$120 (GBP60.94) to rebuild the crankshaft.

DSC00193.JPG

To fit the crankcase bearings I first polished the housings with Scotchbrite and checked for nicks and burrs.

The bearings were stored next the the sausages in the freezer overnight.

DSC00200.JPG

Next I used my neighbour's heat gun to heat the crankcase to 75degC.

DSC00199.JPG

Measuring the crankcase temperature with my handy-dandy handheld laser Raytek thermo gun.

DSC00201.JPG

Once the case reached 75degC I unpacked the bearings from the heavy newspaper wrapping I used to transport them from the

kitchen to the workshop.  They dropped into the holes under their own weight, the only exception being the balancer shaft bearing 

which required a light tap to seat.

More next week.  Hopefully.


-- Edited by Lin on Monday 24th of September 2012 07:48:44 AM


-- Edited by Lin on Monday 24th of September 2012 11:02:07 AM

Attachments
__________________
Lin


Senior Member

Status: Offline
Posts: 129
Date:
Permalink  
 

Yes, it's a forged piston and comes with a nice surface finish.


-- Edited by Lin on Sunday 30th of September 2012 05:14:46 AM

__________________


Senior Member

Status: Offline
Posts: 148
Date:
Permalink  
 

Thanks for taking the time to document all of this!

Quite a job & though I don't forsee having to do this anytime soon, when the time comes I'll know where to look.

The new piston is really something, did it come that polished?


__________________

NEK (Almost in Canada)

VERMONT USA

Lin


Senior Member

Status: Offline
Posts: 129
Date:
Permalink  
 

The Wiseco piston vs the original Yamaha piston.

DSC00232.JPG

A comparison of the piston crown shows the Wisco has a different profile with a little more squish area than the Yamaha.

Wiseco quotes 10.5:1 compression ratio compared to the standard 10.2:1.

DSC00233.JPG

The underside really reveals the benefit of a forged piston over a cast one.  The distribution of material 

throughout the piston can be much more closely controlled giving a more efficient design.  I don't have scales to compare weights

but I'd say the Wisco is at least the same weight (and maybe lighter) despite being larger in diameter.  Obviously Wiseco

decided the oil drillings were unnecessary.

DSC00234.JPG

Side view showing the additional machining of the Wisco piston.  

The ring pack is different to the Yamaha as follows:

Top ring thickness: Wiseco 1.00mm Yamaha 1.00mm

Radial width: Wisco 2.65mm  Yamaha 3.10mm

2nd ring thickness:  Wisco 1.7mm  Yamaha 1.00mm

Radial width: Wisco 3.25mm  Yamaha 3.10mm

Oil ring thickness: Wisco 2.75mm  Yamaha 2.40mm

Note the Yamaha oil ring measurement doesn't agree with the service manual figure (2.00mm) but that's

what my callipers tell me. 


-- Edited by Lin on Sunday 30th of September 2012 05:16:08 AM

Attachments
__________________
Lin


Senior Member

Status: Offline
Posts: 129
Date:
Permalink  
 

Bearing Problem

One does not normally inspect new bearing races before fitting the bearings.  We can generally trust the manufacturer to provide a reliable product and go ahead and install it with confidence. Well, in this case not so.  After fitting the new crankcase bearings last week, this week I happened to just give the installed bearings a cursory twist, more out of idle interest than anything else.  To my alarm both balance shaft bearings felt very "notchy".

Bearing in mind the balance shaft revolves at engine rpm, and suspecting dirt had somehow got in them I extracted and washed them, blow drying with compressed air and a light lube with WD40.  They were no better and felt very second hand - rough, noisy and lumpy.  As I paid very little for these particular bearings (6302 is the bearing number) out of interest I went back to the supplier and bought another.  And guess what...?  It was the same...

Changing supplier I bought NTN brand, nice, smooth running bearings straight out of the box....  But considerably more expensive.

DSC00219.JPG


Attachments
__________________


Super Guru

Status: Offline
Posts: 8566
Date:
Permalink  
 

Thanks for the warning Lin. A case of "you get what you pay for" I guess cry

I hope the rebuild goes "smoothly" from now on wink

Brian


__________________

Exeter, Devon, UK

http://www.ttr250.com  - The one and only dedicated TTR250 FAQ! 
 

TIP: For easy viewing bookmark the "Recent Posts" view - http://ttr250.activeboard.com/p/recent/ 

1 2  >  Last»  | Page of 2  sorted by
 
Quick Reply

Please log in to post quick replies.


Create your own FREE Forum
Report Abuse
Powered by ActiveBoard