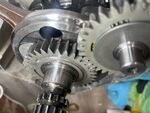
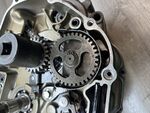
Fitting my 350 kit and have just started reassembling. I’ve pressed the crankshaft into the bearing using the flywheel bolt and a socket per the suggestion in the excellent guide but the teeth on the crank are sitting slightly higher than the balancer teeth
The picture I took before taking apart doesn’t show it too clearly but does look like they lined up, and th assembled pic in the guide seems to show them lined up nicely
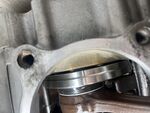
I’ve tried putting my puller back on but it doesn’t go any further and the crank looks about as close to the case as it’ll get. I’ve checked the depth of the socket and the crank isn’t bottoming out there
I could possibly tighten harder on the puller but I’m constrained by holding the crank by hand to stop it spinning and can’t get much torque in it. Could use my gear jammer but doesn’t seem a good idea to put too much torque through the balancer cog when it’s not in both its bearings
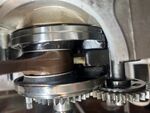
If you look at the wear pattern on the crank cog in your pic, it looks to me like the balancer cog was running a bit inboard of the edge. They are not the same width gears either so don't assume the edges would necessarily line up. Test fit the other half of the crankcase, nip up the bolts and check the crank and balancer spin freely and are not binding by being tight against anything. I think it's probably ok. Don't panic
Don't forget to line up the dot marks on the gears
Well spotted with the wear pattern, hadn’t noticed that
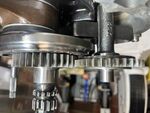
Got the gears in last night, very satisfying to get that all assembled and run through the gears but I was still a little concerned about that crank, your post has lifted a weight for me this morning! I had seen the gears were different widths but the photos showing them lined up had me worried I’d cause myself an issue further down the line
Just waiting on my loctite 574 and the cases can be joined up, can’t wait to get it running
Got a bit more done the last couple evening, a little limited by getting the baby to sleep!
Got the casings together and been fitting the clutch side parts, my oil pump cover is warped and hits the cog when fitted. I tried bending it back to shape but noticed rub marks inside that suggest it could have been rubbing before. Since this cover was not on later TTRs I’ve left it off. I did leave the backplate on since it serves as a kind of washer behind the screws and figure it can’t do any harm (correct me if I’m wrong there!)
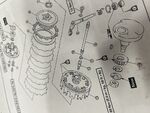
Bigger problem is when I dismantled the clutch there was no push rod oil seal, part 11 on my attached image. Looking for the part I notice on totallyttrs equivalent fiche it isn’t there. Also when I put it together the clutch actuator lines up with the mark so I’m positive it was never there. Is it similar to the pump cover in that it was only there on certain years?
-- Edited by IOWChris on Wednesday 11th of February 2026 09:56:16 PM