Hi , just wanted to introduce myself. Purchased a blue TTR in January this year and now a member of the Surrey TRF. Got a few lanes under my belt now and must say what a capable bike it is. Easy to ride, will go anywhere and inspires confidence. Only problem I have is my legs are a bit short so may have to invest in a lowering kit. This is a wonderful forum with so much information available - well done.
Hi Martyn, thanks for the welcome. I have been reading your reply to 'Hi from Nottingham' who was asking about sprag clutches and oil changes. I too was concerned about sprag clutches when purchasing but there was no noise starting and no banging on switch off. However there is a definite 'clunk' when turning off. Is this not normal or do I need to get it checked out before more damage done. The bike is 2004 and has done 8,500 miles which I think is genuine.
winding down the spring is another name for sag. there are a few types of sag, the one you need to be concerned about is rider/race sag. as the previous person has pointed out, 100mm or 10cm is perfect for trail bikes. the bracket you should aim for is 90-110mm or 9-11cm. but if you can get it to 100mm that is perfect.
static sag is a different thing all together. some people use static sag to tell if their springs are no good. its the same as the other method, but instead of the second part where you get on in your gear, you take the measurement with the bike supporting its own weight without a rider. anyway, you dont need to worry about that, maybe...
You have to be careful when searching google etc to find "rider sag" or "race sag", because my other bike, a ducati 1100 is set up for the race track, and race bikes and well set up street bikes have rider sag set for 35mm, completely different to trail bikes. this would be crap off road, im not even sure you would be able to get it so hard on our bikes.
If you were to make it overly soft as an alternative to lowering it by other methods, the overall handling would suffer. it would react slower in turns especially on the street, and bog down more under throttle. It was said that ground clearance would suffer by installing the lowering link, this may be true, but i think that a bike with overly soft suspension would be worse and could actually bottom out more (reducing ground clearance) than a bike with a lowering link that has well set up suspension.
shave the seat i say.
i found this:
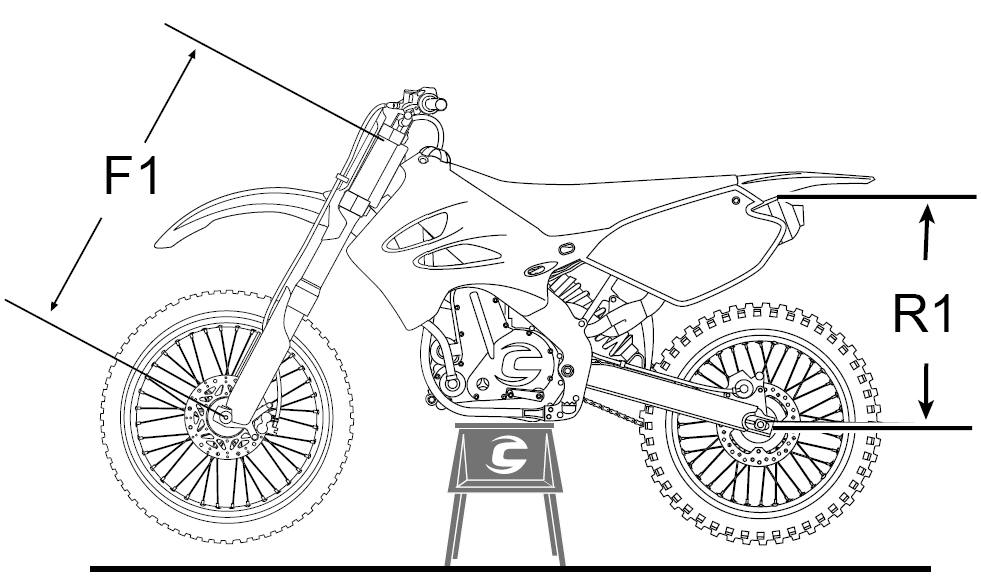
The first is with the suspension extended, bike on stand with wheels off the ground.
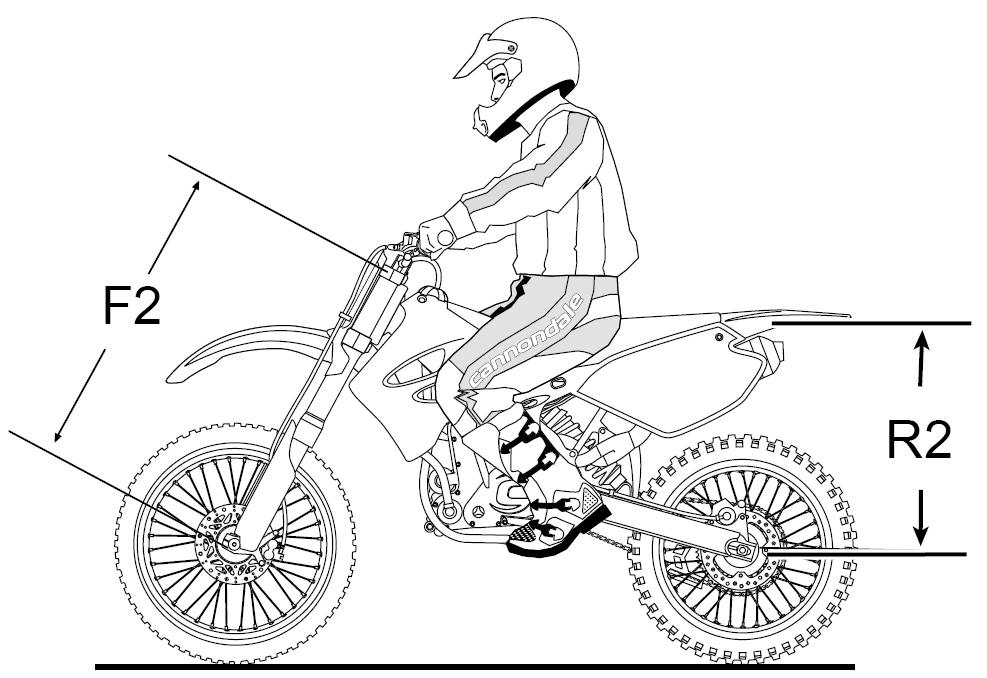
The second is with the rider IN FULL GEAR on the bike. I usually stand on the foot pegs for this measurement.
You'll have to lean on a wall or have an assistant hold the bike upright. Make sure you are balanced, using only
slight fingertip pressure to keep the bike upright.
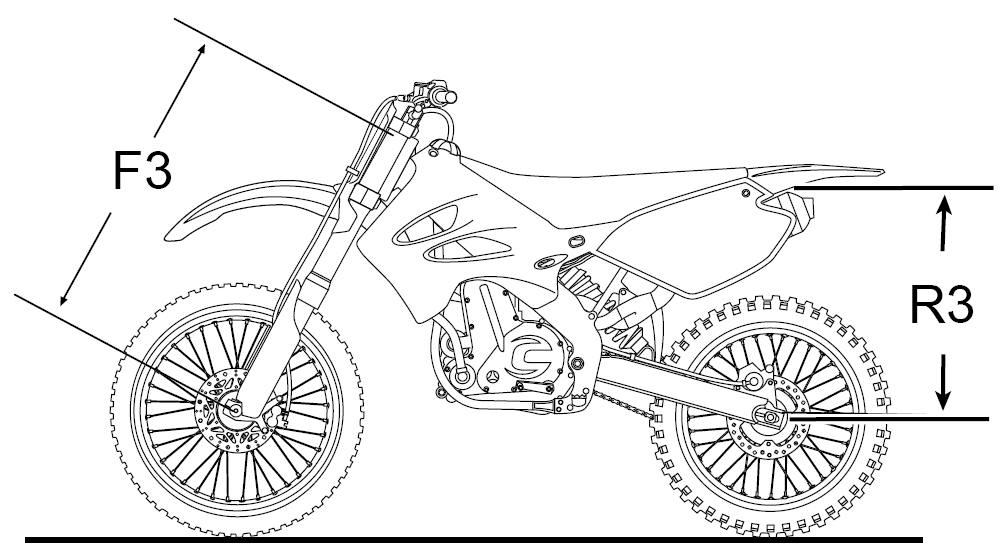
And the last is the bike supporting it's own weight. Again, it must be balanced as in measurement 2.
These will require an assistant, obviously. The rear measurements can be from anything around the
rear axle to some point on the rear fender, more or less straight up from the axel. It's important to use
the same points each time.
Setting your 'Race Sag'
so your bike has a chance to work right
When you subtract measurement 2 from measurement 1, that is your 'race sag'. Most modern bikes have
12 inches of rear wheel travel, and require 3.75 to 4 inches of race sag. Your owners manual should list
your particular bikes requirements. My bike lists it as 100mm +/- 5mm. If no data is available,
use 1/3 to 30% of the total wheel travel. If it's a full size MX bike (125 through 500), you can set
it to 4 inches and you'll be good to go. There are two spanner type nuts on your shock holding
the spring at the top end. First loosen the upper one (the lock nut) and then adjust by turning the
lower one. You can check as you go make the adjustment without tightening the locknut back down,
just jump on and get the new R2 measurement. R1 won't change.
Front wheel travel is also usually 12 inches. My bike lists the race sag at 80mm +/- 5mm. Check your manual.
When you subtract measurement 3 from measurement 1, that is the 'static sag'. This isn't something you set.
Your static sag should be within the limits given in your owners manual. If it is not, you need to change the
spring, set the race sag, and measure again. My manual lists front and rear static sag at 30mm, +/- 5mm.
If your static sag is too little, it means that you have had to set too much preload to get the race sag in spec.
This means that your spring is too weak. If there is too much static sag, the spring is too strong. A good
suspension shop should be able to tell you what spring rate you will need, based on your bike make and
model, and on your weight. When you get all this right, your bike will perform the way it was designed;
-- Edited by davecambo on Tuesday 21st of February 2012 09:00:35 AM
1. find a spot near the axle (eg on top of swingarm just behind axle) - call it "A" 2. find a spot on frame fairly vertically above "A" (eg the blinker mount) - call it "B" 3. put bike on stand (rear wheel OFF ground) and measure distance A to B (eg 62cm) 4. take bike off stand 5. sit on bike, with all riding gear on (feet off ground - you may need an assistant) 6. measure distance A to B again (eg now squished down to 52cm by the bike's weight plus your weight)
if the two measurements differ by 10cm, your spring is adjusted ok for your weight. if the difference is less than 10cm then you can profitably adjust it for lower ride height and more comfortable ride.
even if the measurement difference is correct you can also over-adjust it deliberately for a softer lower ride, but this moves the suspension away from its "sweet spot".
adjustment:
you have to be able to get at the two large castellated nuts (adjuster nut plus lock nut on top) which are at the top of the spring. theoretically you need a special tool but everyone just uses a large blunt screwdriver or punch to turn them by hitting with hammer.
first get the top nut to move, and then wind it up (ie back, anticlockwise viewed from top) a few turns. then wind the bottom nut up, by more tapping. this is tedious, you might want to also try grabbing the spring and turning it (it tends to move with the bottom nut).
then re-measure - a small change in the spring makes a bigger change in the ride height.
the catch with all this is that you have to remove parts to get at the nut on the top of the spring. very minimum is seat, right cover, battery and probably battery box. ideal is also the airbox.